This document will explain how to deposit assets (using USDT as an example) stored on the Ethereum network, via MetaMask, into a DCS D-Lite card.
There are four main steps:
- Connect Wallet: Connect MetaMask wallet to the PlatON Wallet.
- Cross-chain Deposit: Use the Bridge feature in Deposit to transfer USDT from the Ethereum network to the PlatON network.
- Exchange for DUSD: Utilize Swap to exchange USDT on the PlatON network for DUSD.
- Deposit to Card: Transfer DUSD into the DCS D-Lite card.
![]() In the above operations, if you need LAT as a transaction fee, you can claim 0.005 LAT here. Each address can only claim once!
In the above operations, if you need LAT as a transaction fee, you can claim 0.005 LAT here. Each address can only claim once!
PlatON Wallet:https://wallet.platon.network/
Claim LAT: https://incentive.platon.network/
Step 1: Connect MetaMask Wallet to PlatON Wallet
Users can connect to the PlatON Wallet via three methods:
-
Opening the web browser
It is recommended to open the Wallet using the Chrome browser.
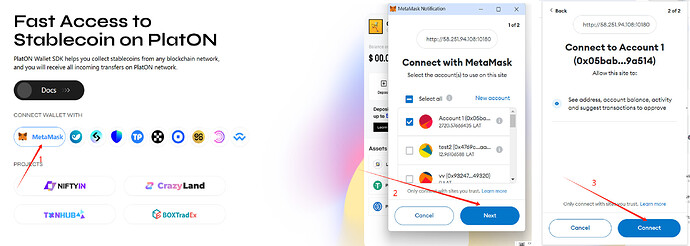
- Click on the MetaMask wallet logo to trigger the wallet plugin for connection (assuming MetaMask is already installed).
- Select the account you wish to connect to.
- Click “Connect” (for the first connection, please allow adding and switching to the PlatON network).
-
Open the Wallet on your mobile browser.
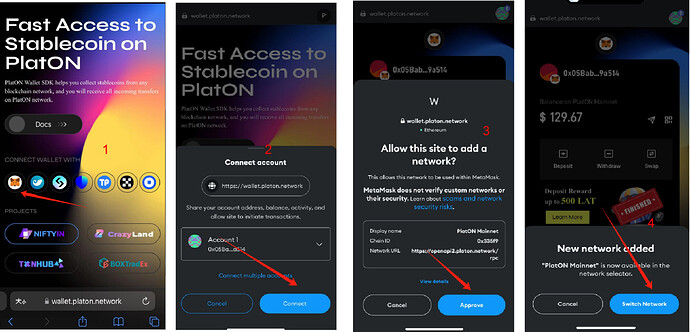
- Tap on the MetaMask wallet logo to prompt the wallet plugin for connection (assuming MetaMask is already installed).
- Choose the account you want to connect with.
- Tap “Connect” (For the initial connection, grant permission to add and switch to the PlatON network).
-
Open in the Built-in Browser of Web3 Wallet App
Simply open the wallet address in the built-in browser of your Web3 wallet app. Follow the same steps as you would in a mobile browser.
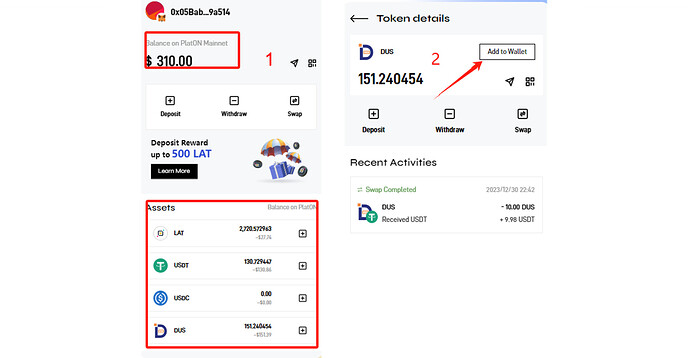
Once connected successfully, you can view the current assets of the connected wallet on the PlatON network. Additionally, you can click “Add to Wallet” to add this asset to MetaMask.
Step Two: Cross-chain Deposit
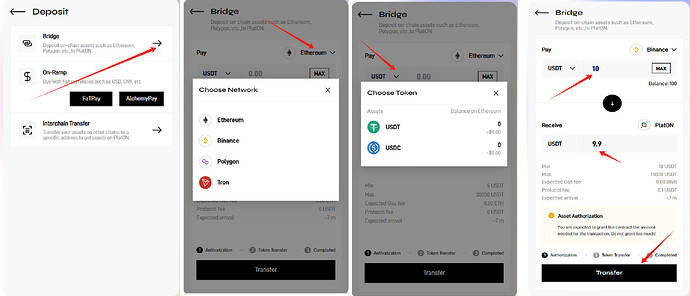
Cross-chain deposit supports users in transferring USDT and USDC from Ethereum, Polygon, and BSC networks to the PlatON network.
Navigate to the Bridge option on the Deposit page. Once on the Bridge page, select the desired network and asset type. Enter the amount of assets you wish to transfer in the Pay section. You will then see the corresponding amount of assets that will be received on the PlatON network in the Receive section.
After clicking the “Transfer” button, MetaMask wallet will prompt for three interactions: network switching, asset authorization, and transaction signing. If the selected network matches the one currently connected in MetaMask, there won’t be a prompt for network switching. Here’s the process:
- Click “Switch network” to confirm the network switch. After successful switching:
- MetaMask will prompt for authorization. Input the authorization amount (usually no need to change), click “Next”, then click “Approve” to authorize the transaction (this step involves initiating a transaction through a contract and requires paying transaction fees).
- After successful approval, MetaMask will prompt for confirmation of the cross-chain transaction. Click “Confirm” to confirm the transaction.
When users conduct cross-chain deposit, besides paying the expected gas fee on the chain, we do not charge any additional protocol fees.
Step Three: Exchange for DUSD
Through Swap, exchange the transferred USDT for DUSD.
- Click on “Swap” on the homepage to enter the exchange page.
- Select the desired asset type to exchange, input the quantity to be exchanged, then click the “Swap” button.
- MetaMask wallet will prompt to confirm the authorization amount (do not change the authorized amount).
- Click “Approve” in MetaMask to authorize.
- Click “Confirm” to confirm the transaction.
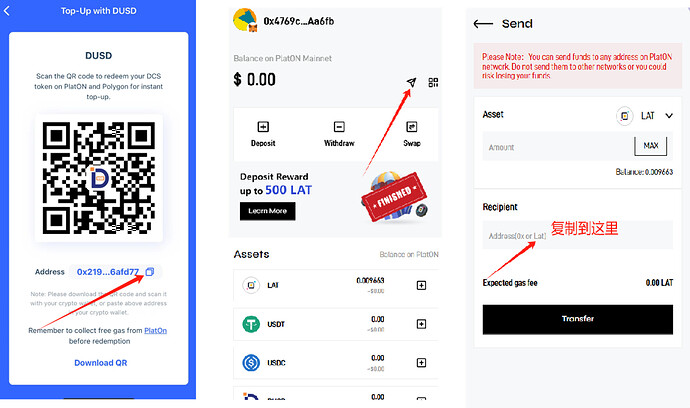
Step Four: Deposit to Card
Open the DUSD deposit page in the DCS app. Copy the deposit address to the “Send” page of your wallet. Click “Send” to complete the deposit!
