本章我们完成交易列表,检测转账是否成功以及导出钱包秘钥的功能。
创建交易列表页面
把交易列表和交易记录一样编写成一个组件。在component目录下创建pending-transaction-table.vue文件,部分代码如下:
<template>
    <div class="pending-tx-record">
        <el-table :data="datas" style="width: 100%" height="400">
            <el-table-column prop="txHash" label="交易哈希值" width="250">
                <template slot-scope="scope">
                    <span class="ellipsis" :title="scope.row.txHash">{{ scope.row.txHash }}</span>
                </template>
            </el-table-column>
            <el-table-column prop="blockNumber" label="区块"> </el-table-column>

            <el-table-column prop="to" label="接收地址" width="240">
                <template slot-scope="scope">
                    <span class="ellipsis" :title="scope.row.to">{{ scope.row.to }}</span>
                </template>
            </el-table-column>

            <el-table-column label="发送时间" width="240">
                <template slot-scope="scope">
                    <span>{{ timestampToStr(scope.row.timestamp) }}</span>
                </template>
            </el-table-column>

            <el-table-column prop="status" label="状态"> </el-table-column>

            <el-table-column prop="value" label="价值"> </el-table-column>
        </el-table>
    </div>
</template>
在这里显示的字段有:
- 交易哈希
- 接收地址
- 当前状态
- 发送时间
- 所在区块
- 发送LAT数量
- 状态 状态有: 确认中,待处理两个状态
打开main-page.vue页面,使用该组件
import pendingTransactionTable from "@/component/pending-transaction-table.vue";
然后使用该组件
 <div class="transaction-record-container" v-if="tabIndex === 1">
      <pending-transaction-table :address="address" />
</div>
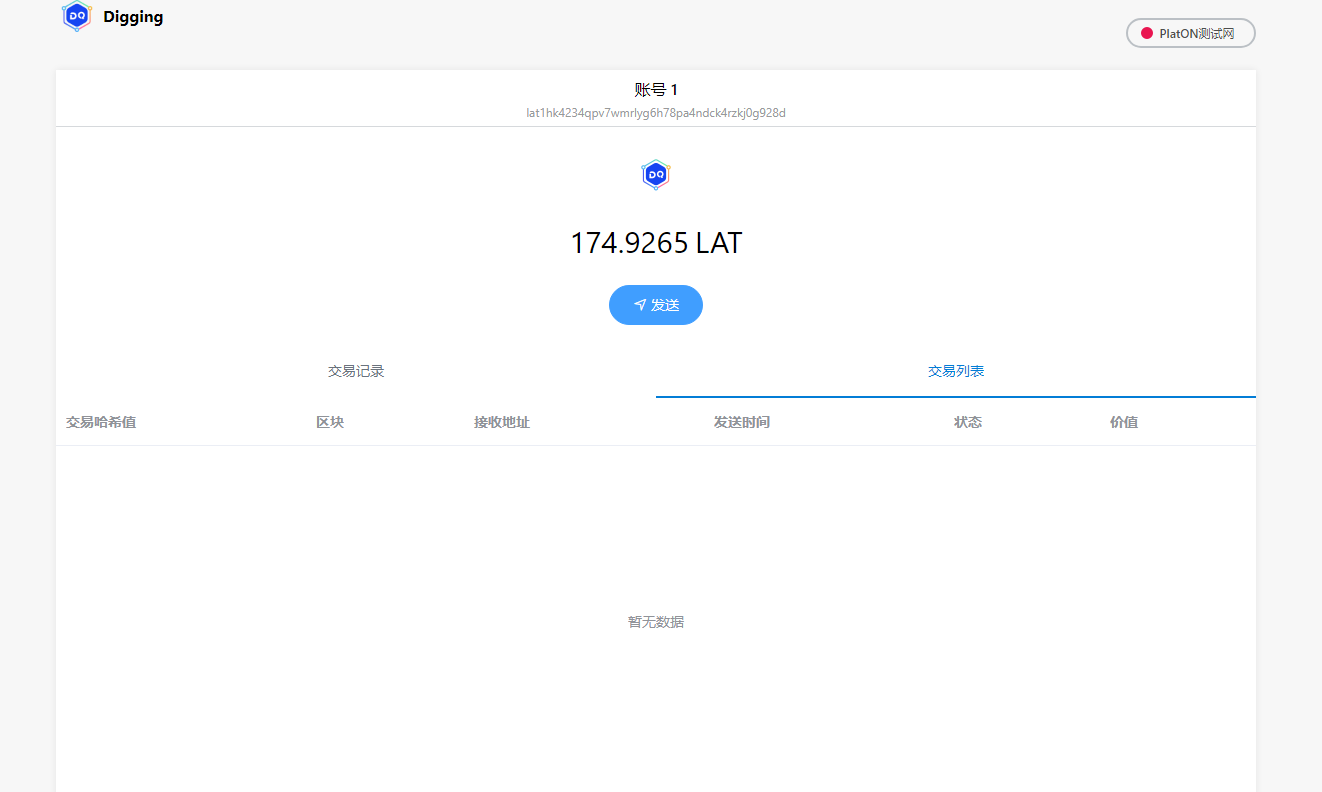
效果如下图:
记录交易记录逻辑
交易列表的数据, 需要我们自己去记录.打开background.js文件,找到交易管理类TransactionManager,添加一下代码:
- 1, 增加 记录交易记录得到函数 addTxRecord,代码如下:
    /**
     * 添加交易记录
     * @param {交易哈希} transactionHash
     * @param {交易数据} txData
     * @param {收据} receipt
     */
    static async addTxRecord(transactionHash, txData, receipt) {
        let web3 = TransactionManager.getWeb3Ins();
        // 以交易哈希作为key
        let txRcordInfo = {
            txHash: transactionHash,
            value: web3.utils.fromVon(txData.value, "lat"), // lat数量
            from: txData.from, // 发送人
            to: txData.to, // 接收人
            timestamp: new Date().getTime() // 发送时间
        };
        // 记录交易记录
        TransactionManager.pendingTxRecords[transactionHash] = txRcordInfo;

        if (receipt) {
            txRcordInfo.status = "确认中";
            txRcordInfo.blockNumber = receipt.blockNumber; // 记录所在块高
        } else {
            txRcordInfo.status = "待处理";
        }
        //  持久化交易记录
        await TransactionManager.persistTXRecord();
        // 启动监控器
        TransactionManager.startTxMonitor();
    }
- 2, 修改SendLATTO函数的代码, 修改部分如下:
    /**
     * 发送lat
     * @param {lat数量} lat
     * @param {接收地址} toAddress
     */
    static async SendLATTO(lat, account, toAddress) {
   ... 省略代码

        let signTxtData = await web3.platon.accounts.signTransaction(txData, walletInfo.privateKey);
        let txInfo = await web3.platon.sendSignedTransaction(signTxtData.rawTransaction);
        // 获取的收据
        let receipt = await web3.platon.getTransactionReceipt(txInfo.transactionHash);

        if (receipt === null) {
            // pending状态
            // 持久化交易记录
            TransactionManager.addTxRecord(txInfo.transactionHash, txData, receipt);
            return {
                errCode: WARNNING,
                errMsg: "交易等待处理中"
            };
        }

        // 如果交易失败,则直接返回
        if (!receipt.status) {
            return {
                errCode: Error,
                errMsg: "发送失败!",
                data: {
                    txHash: txInfo.transactionHash,
                    receipt: receipt
                }
            };
        }
        // 持久化交易记录
        TransactionManager.addTxRecord(txInfo.transactionHash, txData, receipt);
        return {
            errCode: SUCCESS,
            data: {
                txHash: txInfo.transactionHash,
                receipt: receipt
            }
        };
    }
这个函数增加了调用addTxRecord的逻辑, 这里需要注意的是,如果交易收据receipt为null时,交易则处在待处理中.
- 3, 添加监控交易记录状态的函数
交易记录好后,我们需要启动一个定时器,定时器去监控每一个交易的状态,代码如下:
   static startTxMonitor() {
        // 监控器已经在 运行中,不重复运行
        if (TransactionManager.isMonitoring) {
            return;
        }
        //正在监控中
        TransactionManager.isMonitoring = true;

        TransactionManager.checkTXRecordStatus();
    }
    // 检查交易记录状态
    static checkTXRecordStatus() {
        setTimeout(async () => {
            let txHashList = Object.keys(TransactionManager.pendingTxRecords);
            if (txHashList.length === 0) {
                // 当前没有待确认的交易列表
                // 把监控状态设置为false然后直接返回
                TransactionManager.isMonitoring = false;
                return;
            }
            let web3 = TransactionManager.getWeb3Ins();
            // 获取当前块高
            let blockNumber = await web3.platon.getBlockNumber();
            for (let i = 0; i < txHashList.length; ++i) {
                let txHash = txHashList[i];
                // 获取交易记录
                let txRcordInfo = TransactionManager.pendingTxRecords[txHash];
                if (txRcordInfo.status === "确认中") {
                    // 设置确认块高为6, 则认为交易已经成功!
                    if (blockNumber - txRcordInfo.blockNumber > 6) {
                        // 已经确认的,则从监控列表中删除
                        delete TransactionManager.pendingTxRecords[txHash];
                        continue;
                    }
                } else if (txRcordInfo.status === "待处理") {
                    // 获取的收据
                    let receipt = await web3.platon.getTransactionReceipt(txHash);
                    // 还是没有获取到收据,交易还在待处理中,需要处理
                    if (receipt === null) {
                        continue;
                    }
                    // 判断确认块高是否已经超过6,如果超过6则已经交易成功
                    if (blockNumber - receipt.blockNumber > 6) {
                        delete TransactionManager.pendingTxRecords[txHash];
                        continue;
                    }

                    // 确认块高未超过6, 交易记录状态编程确认中
                    txRcordInfo.blockNumber = receipt.blockNumber; // 记录所在块高
                    txRcordInfo.status = "确认中";
                }
            }

            //  持久化交易记录
            await TransactionManager.persistTXRecord();
            // 继续监听
            TransactionManager.checkTXRecordStatus();
            // 10s检查一次
        }, 1000);
监控器10秒去检查一次状态, 如果确认块高大于6,则认为交易完成.
- 4, 添加插件启动时加载交易记录
因为插件可能在有未完成交易记录的情况下被关闭,因此,插件在启动时必须继续去监听未完成的交易记录,代码如下:
    /**
     * 插件启动时,需要从store加载未完成的交易记录
     */
    static LoadPendingTxRecord() {
        chrome.storage.local.get(["pendingTxRecords"], res => {
            let records = res["pendingTxRecords"];
            // 没有交易记录直接返回
            if (!records) {
                return;
            }
            TransactionManager.records = records;

            // 启动监控器

            TransactionManager.startTxMonitor();
        });
    }
调用该函数的方法如下:
// 加载交易记录
TransactionManager.LoadPendingTxRecord();
// 导出PasswordManager
window.digging = {
    PasswordManager,
    PrivateKeyManager,
    TransactionManager
};
- 5, 添加获取交易列表的函数
    /**
     * 获取交易列表
     * @param {钱包地址} address
     */
    static GetPendingRecords(address) {
        let txHashList = Object.keys(TransactionManager.pendingTxRecords);
        let txRecords = [];
        for (let i = 0; i < txHashList.length; ++i) {
            let txHash = txHashList[i];
            // 获取交易记录
            let txRcordInfo = TransactionManager.pendingTxRecords[txHash];
            if (txRcordInfo.from === address) {
                txRecords.push(txRcordInfo);
            }
        }
        return txRecords;
    }
通过这个函数可以获取到每个钱包的交易列表.
- 6, 编写pending-transaction-table.vue逻辑,代码如下:
        loadData() {
            //
            this.datas = this.digging.TransactionManager.GetPendingRecords(this.address);

            if (this.isPooling) {
                return;
            }
            this.isPooling = true;

            this.loopPullData();
        },

        loopPullData() {
            //  做退出标记,否则及时页面销毁了,也会一直执行
            if (this.bStop) {
                return;
            }
            setTimeout(() => {
                this.loadData();
            }, 10000);
        }
这里用到了一个定时器,定时去获取交易列表.需要注意的是,一定要给定时器添加一个提出标志,否则会就算页面销毁,定时器也是在执行的.
编写好逻辑后,我们发送一笔转账,看出交易列表如下:
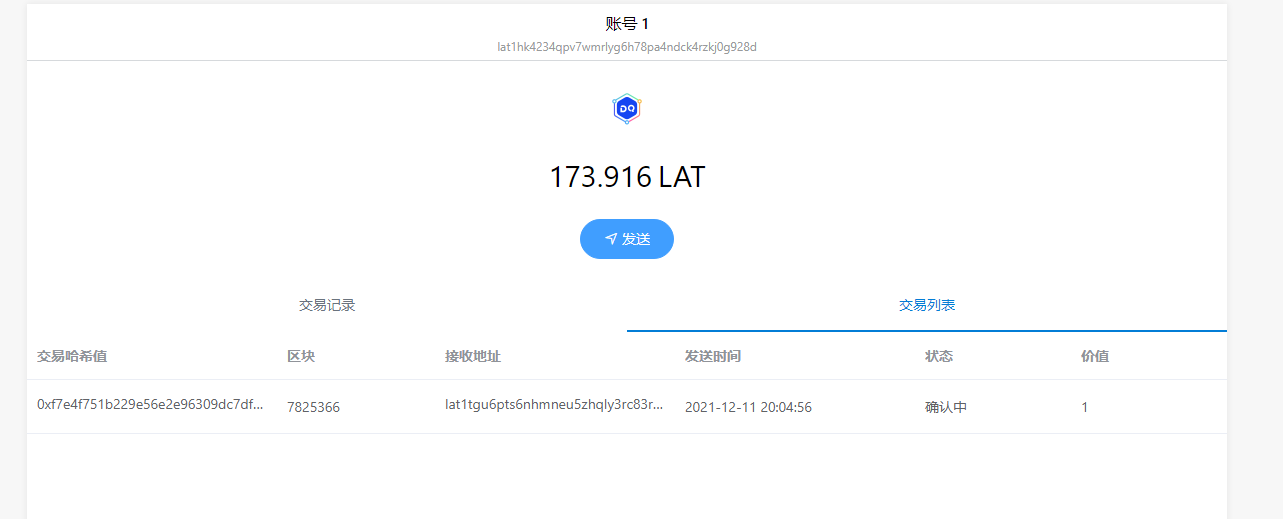
大概在10s后交易记录就会完成,然后该列表显示为空
接着我们完成剩余功能,
显示交易收费
在TransactionManager中添加一下代码:
    /**
     * 计算手续费
     */
    static async CalcGasUsed() {
        let web3 = TransactionManager.getWeb3Ins();
        let gasPrice = await web3.platon.getGasPrice();
        //
        // 手续费 = gasPrice * gasLimit  gasLimit设置为= 21000;
        // 这里需要把值换成字符串,
        return web3.utils.fromVon((gasPrice * 21000) + "", "lat");
    }
打开send-lat-page.vue文件, 在mount函数中,添加一下代码:
    async mounted() {
        this.sendInfo.gasfee = (await this.digging.TransactionManager.CalcGasUsed()) + " Lat";
    },
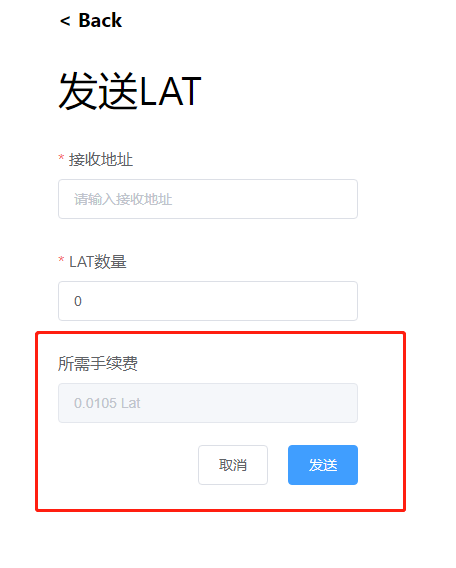
效果如下图:
添加导出秘钥的功能
在main-page.vue文件中,添加如下代码:
<div class="horzontal-layout menu-bar ">
    <div class="flex-1"></div>
    <div class="vertical-layout flex-1 flex-center ">
        <span class="account">{{ accountName }}</span>
        <span class="address">{{ address }}</span>
    </div>
    <div class="flex-1 horzontal-layout flex-center">
        <span class="flex-1"></span>
        <el-dropdown trigger="click">
            <i title="账户选项" class="el-icon-more more-btn"></i>
            <el-dropdown-menu slot="dropdown">
                <el-dropdown-item icon="el-icon-bank-card"
                    >账户详情</el-dropdown-item
                >
            </el-dropdown-menu>
        </el-dropdown>
    </div>
</div>
效果如下图:

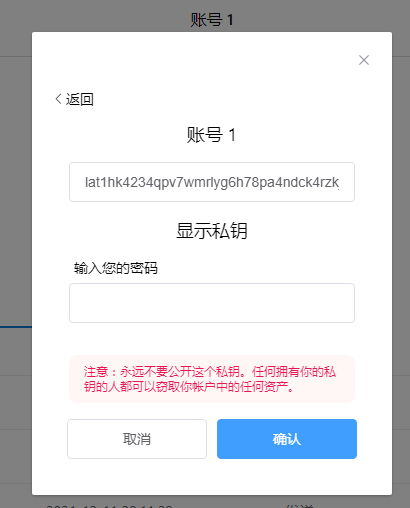
接着编写导出秘钥的页面, 在component目录下添加account-detail-info.vue页面, 部分代码如下:
<template>
    <div class="account-detail-info">
        <div v-show="!showExport">
            <div class="horzontal-layout flex-center" style="margin-bottom:16px;">
                <span style="font-size:18px;color: black;"> {{ accountName }}</span>
            </div>
            <div class="horzontal-layout flex-center" style="margin-bottom:16px;">
                <div class="qrCode" ref="qrCodeDiv"></div>
            </div>

            <div class="horzontal-layout flex-center" style="margin-bottom:16px;">
                <el-input v-model="address" style=" width: 286px;" />
            </div>

            <div class="horzontal-layout flex-center" style="margin-bottom:6px;">
                <el-button class="export-btn" type="primary" @click="showExport = true"
                    >导出私钥</el-button
                >
            </div>
        </div>
        <div v-show="showExport">
            <div class="horzontal-layout" style="margin-bottom:16px;">
                <span
                    style="color: black;"
                    @click="showExport = false"
                    class="pointer el-icon-arrow-left"
                    >返回</span
                >
            </div>

            <div class="horzontal-layout flex-center" style="margin-bottom:16px;">
                <span style="font-size:18px;color: black;"> {{ accountName }}</span>
            </div>
            <div class="horzontal-layout flex-center" style="margin-bottom:16px;">
                <el-input v-model="address" style=" width: 286px;" />
            </div>
            <div class="horzontal-layout flex-center" style="margin-bottom:16px;">
                <span style="font-size:18px;color: black;"> 显示私钥</span>
            </div>

            <template v-if="!privateKey">
                <div class="horzontal-layout " style="margin-bottom:6px;">
                    <span style="color: black;margin-left: 22px;"> 输入您的密码</span>
                </div>
                <div class="horzontal-layout flex-center" style="margin-bottom:16px;">
                    <el-input type="password" v-model="password" style=" width: 286px;" />
                </div>
            </template>
            <template v-else>
                <div class="horzontal-layout " style="margin-bottom:6px;">
                    <span style="color: black;margin-left: 22px;"> 这是您的私钥</span>
                </div>
                <div class="horzontal-layout flex-center">
                    <el-input
                        class="private-key-password-display-textarea"
                        type="textarea"
                        v-model="privateKey"
                        rows="2"
                        resize="none"
                    />
                </div>
            </template>

            <div class="horzontal-layout flex-center">
                <div class="private-key-password-warning">
                    注意:永远不要公开这个私钥。任何拥有你的私钥的人都可以窃取你帐户中的任何资产。
                </div>
            </div>

            <div class="horzontal-layout flex-center" style="margin-bottom:6px;">
                <el-button class="bar-btn" @click="showExport = false"> 取消</el-button>

                <el-button class="bar-btn" type="primary" @click="onExportPrivateKey"
                    >确认</el-button
                >
            </div>
        </div>
    </div>
</template>
这里生成钱包地址的二维码,需要安装qrcodejs2库, 在工程目录下打开控制台,输入 npm install qrcodejs2命令即可.在main-page.vue页面以对话框的方式,使用该组件, 代码如下:
       <el-dialog
            v-if="bShowAccountDlg"
            width="360px"
            :visible.sync="bShowAccountDlg"
            append-to-body
        >
            <account-detail-info :accountName="accountName" :address="address" />
        </el-dialog>
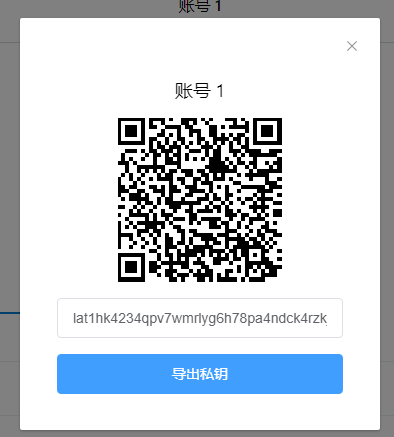
页面效果如下:
好啦本章内容到此结束啦, 下一章我们实现质押LAT以及领取质押奖励.
仓库地址: https://github.com/DQTechnology/Platon_DevGuideProject
